Introduction
Welcome to the Comelit Group integration library! You can use our API to integrate your Android and/or iOS app with the Comelit Group technology and be able to empower your app to fully communicate with the Comelit Group door entry system.
Contributing
Do you have an awesome idea that deserves to be in Comelit Group integration library? You might consider pinging us on slack first to make sure we haven't already ruled it out for some reason.
Changelog
Latest Android version: 0.9.35
- FEAT: expose transitive dependencies
Latest iOS version: 0.7.3
- FEAT: add PrivacyInfo.xcprivacy as required by Apple
Artifactory
The Comelit Group integration library is available on the artifactory repository hosted here.
Gradle key generation
Artifactory provides tight integration with Gradle. All that is needed is a simple modification of your build.gradle script file with a few configuration parameters.
- Login to your account here.
- To display your profile page, click your login name on the top right-hand corner of the screen.
 .
. - To edit your profile, you first need to unlock it by entering your current password and clicking Unlock. Once unlocked, you can modify all the elements of your user profile.
- Artifactory allows authentication for REST API calls using your API key as an alternative to your username and password. To create an API Key, once you have unlocked your profile, click the "Generate" button next to the API Key field.
 .
. - Once an API Key is created, it displayed, masked, in the corresponding field. Click the "View" icon to see the API Key in clear-text, or the "Copy" icon to copy the API Key to the clipboard.
Installing
Comelit Group provide a library for both Android and iOS that can be integrate into your app. The integration is straightforward, for Android the library is shipped as an AAR and for iOS a framework is provided.
Android
allprojects {
    repositories {
        maven {
            url 'http://artifactory.cloud.comelitgroup.com/artifactory/libs-release-3rd'
            credentials {
                username artifactory_user
                password artifactory_key
            }
        }
    }
}
To make use of the Comelit Group integration library in another project you have to add our Artifactory repository to the list of Maven repositories in your top level build.gradle file.
Release library is available here: http://artifactory.cloud.comelitgroup.com/artifactory/libs-release-3rd
Obviously you do not want to store a plain text username and API key in any file that you check in to your version control system. So to make sure you hide those, create a gradle.properties file in the root of your project and add the following content:
- artifactory_user=YOUR_USERNAME
- artifactory_key=YOUR_API_KEY
dependencies {
    implementation (group: 'com.comelitgroup.module', name: 'module', version: '0.9.35', ext: 'aar')
    implementation(group: 'com.comelitgroup.multimedia', name: 'multimedia', version: '0.3.2')
    implementation(group: 'com.comelitgroup.vipcomelit', name: 'vipcomelit', version: '0.5.24')
    implementation 'com.getkeepsafe.relinker:relinker:1.4.4'
    implementation 'org.greenrobot:eventbus:3.2.0'
    implementation 'androidx.constraintlayout:constraintlayout:2.0.1'
}
After you can simply add the artifact as a dependency in the build.gradle file of our main project.
iOS
The import of the Comelit Group integration library in an Xcode project can be either manual or via cocoapods.
Cocoapods
If you don't already use cocoapods in your app, please use this guide to set it up.
#run the following command to add the public comelit podspec repository
pod repo add public-comelit-pods https://bitbucket.org/comelit/public-comelit-pods.git
When cocoapods are set up on your application, to install the CGModule and its dependencies via cocoapods you have to add the public comelit podspec repository
#this the default source for cocoapods since version 1.8
#you can also use https://github.com/CocoaPods/Specs.git if you like
source 'https://cdn.cocoapods.org/'
 #this is the comelit podspec sources
source 'https://bitbucket.org/comelit/public-comelit-pods.git'
Then on top of your Podfile you need to add the public comelit podspec repository as source
#you should probably have this already in place if you use cocoapods in your app

#this is mandatory, because we can release the CGModule only as a dynamic frameworks to avoid runtime clash dependencies.
#if for whatever reason you can't enable the use_frameworks!, you can't use cocoapods to link the CGModule, but you have
#to follow the manual configuration instead
use_frameworks!

target 'YourApp' do # <- your app target name
    project 'Path/To/Your/App/Xcode/Project/YourApp.xcodeproj'  #relative path to your app xcode project

    #your application pods here

    #add this line to install the CGModule
    pod 'CGModule', '0.7.3'
end


#due to a cocoapod limitation (https://github.com/CocoaPods/CocoaPods/issues/9232)
#you need to force this flag in the post_install hook
post_install do |pi|
    pi.pods_project.targets.each do |t|
        t.build_configurations.each do |config|
            config.build_settings['BUILD_LIBRARY_FOR_DISTRIBUTION'] = 'YES'
        end
    end
end
You can now add the CGModule to your app dependencies like you usually do in the Podfile
#add these lines to your .netrc file to allow cocoapods to authenticate to our server, you can found it in ~/.netrc
#if you don't have any ~/.netrc file you can simply create an empty one and then add these line
machine artifactory.cloud.comelitgroup.com
login YOUR_ARTIFACTORY_USER
password YOUR_ARTIFACTORY_KEY
The last step is to setup your local machine with the artifactory credentials, so you will be able to download the pods from our artifactory server. All you need to do is create / edit your .netrc file in your home directory (~) and add your artifactory credentials
pod install
Finally you can install the CGModule by running pod install command inside the folder of your app project. And that's all! you can use the CGModule inside your application
if you can't use cocoapods for your application please follow the manual configuration steps below
Manual configuration
- Login to your account here.
- The Artifacts module in Artifactory displays the Artifact Repository Browser.
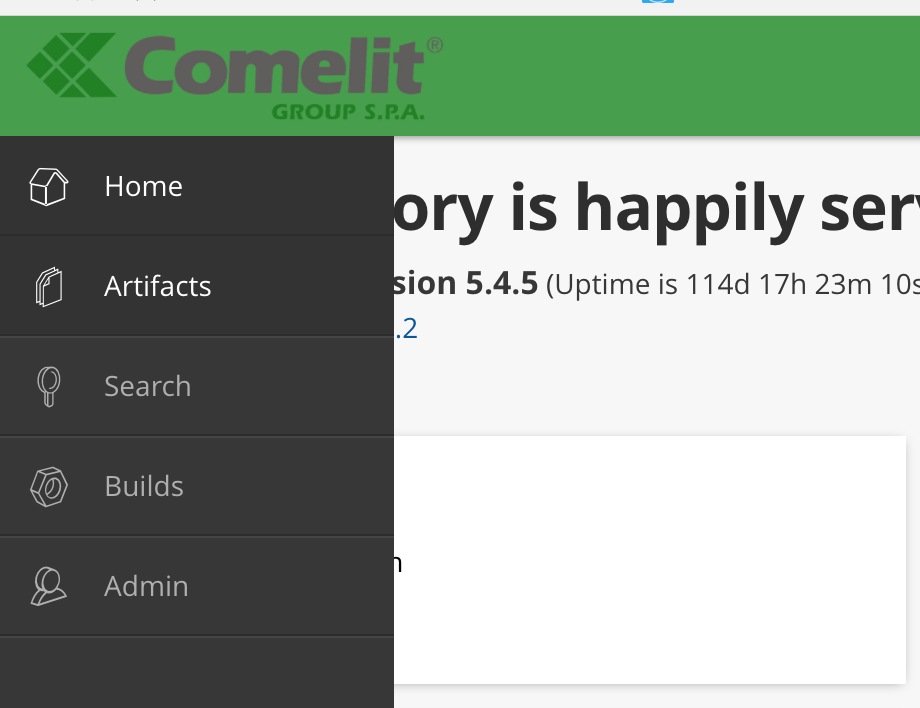 .
. - The Tree Browser lets you drill down through the repository hierarchy and displays full information for each level within it. For any repository, folder or artifact selected in the tree, a tabbed panel displays detailed data views and a variety of actions that can be performed on the selected item. The information tabs available are context sensitive and depend on the item selected.
 .
. - Download the latest release of the Comelit Group integration library and unzip it.
- In your Xcode project, choose Project > Add to Project and select the frameworks directory (used to store the Comelit Group integration library). Alternatively, you can control-click your project group and choose Add Files > Existing Frameworks from the contextual menu.
When you add a framework to your project, Xcode asks you to associate it with one or more targets in your project. Once associated, Xcode automatically links the framework against the resulting executable.
Attention! Some of the CGModule dependencies might be already linked by your app, make sure to link only the missing dependencies. Get in touch with us to verify any compatibility issue among common dependencies.
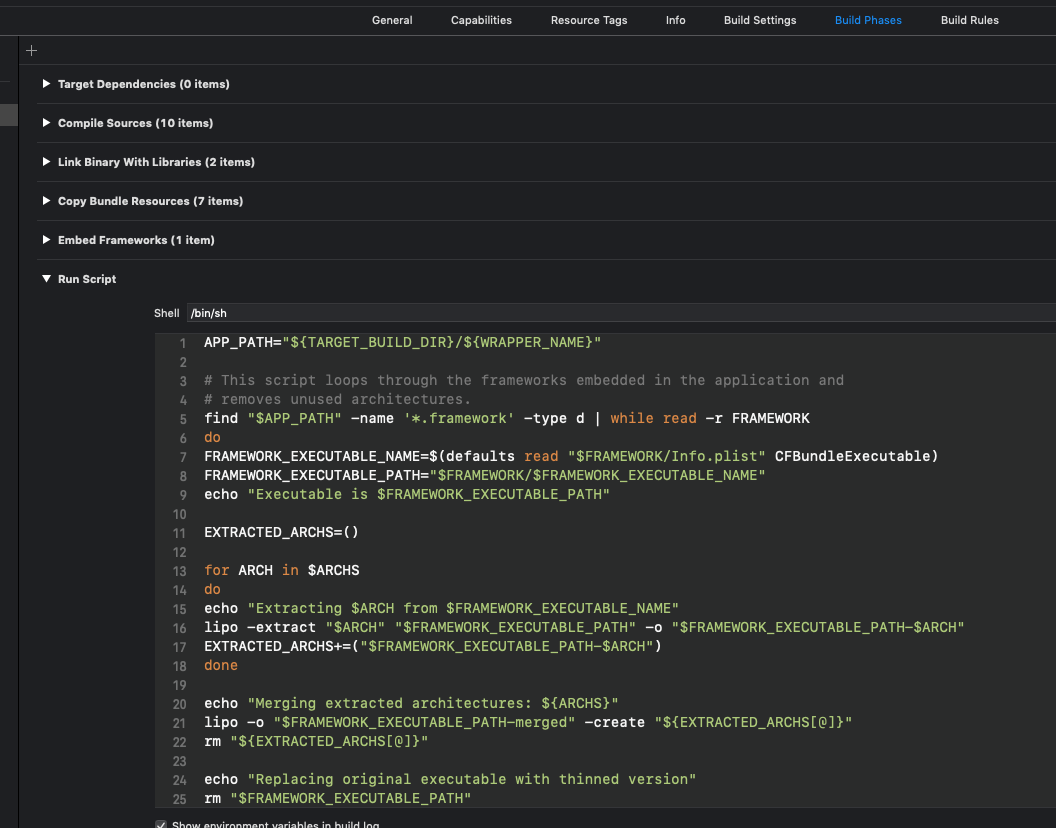
The CGModule framework and its dependencies are compiled also for the simulator to allow you to test your app without a physical device. On the other hand Apple doesn't allow to publish your app with simulator symbols in it. So when you are importing the Comelit frameworks, you need to add a run script action to strip the simulator architectures away when you are releasing.
First you need to add new run script action on your app target build phases:

Copy and paste the script --------------> in the Run Script section that you have just created:
APP_PATH="${TARGET_BUILD_DIR}/${WRAPPER_NAME}"

# This script loops through the frameworks embedded in the application and
# removes unused architectures.
find "$APP_PATH" -name '*.framework' -type d | while read -r FRAMEWORK
do
FRAMEWORK_EXECUTABLE_NAME=$(defaults read "$FRAMEWORK/Info.plist" CFBundleExecutable)
FRAMEWORK_EXECUTABLE_PATH="$FRAMEWORK/$FRAMEWORK_EXECUTABLE_NAME"
echo "Executable is $FRAMEWORK_EXECUTABLE_PATH"

EXTRACTED_ARCHS=()

for ARCH in $ARCHS
do
echo "Extracting $ARCH from $FRAMEWORK_EXECUTABLE_NAME"
lipo -extract "$ARCH" "$FRAMEWORK_EXECUTABLE_PATH" -o "$FRAMEWORK_EXECUTABLE_PATH-$ARCH"
EXTRACTED_ARCHS+=("$FRAMEWORK_EXECUTABLE_PATH-$ARCH")
done

echo "Merging extracted architectures: ${ARCHS}"
lipo -o "$FRAMEWORK_EXECUTABLE_PATH-merged" -create "${EXTRACTED_ARCHS[@]}"
rm "${EXTRACTED_ARCHS[@]}"

echo "Replacing original executable with thinned version"
rm "$FRAMEWORK_EXECUTABLE_PATH"
mv "$FRAMEWORK_EXECUTABLE_PATH-merged" "$FRAMEWORK_EXECUTABLE_PATH"

done
Finally, check that the script runs whenever you build your app:
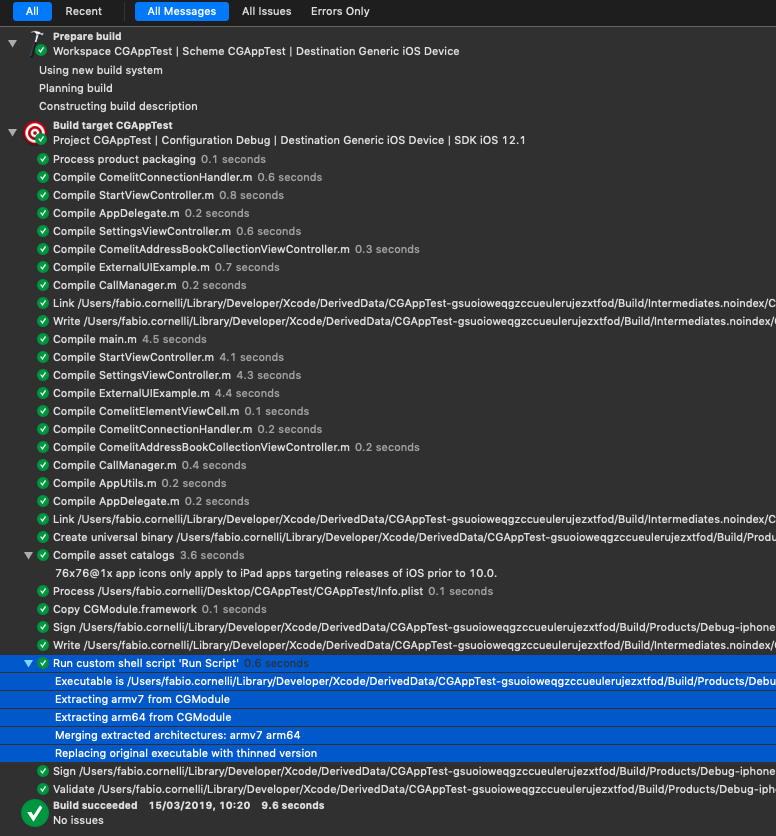
!!! Please make sure your Run Script phase is AFTER Embedded Framework phase in Build phases.
Push Notifications
The Comelit Group door entry system natively uses the push technology to notify to the app that someone is ringing the intercom. by the way, due to the restrictions imposed by the Android and iOS operating system, the Comelit Group integration library cannot automatically manage push notifications. For Android, because the AAR file does not include an applicationId and for iOS because a framework cannot include capabilities.
To get rid of these limitations and let your app leverage the use of push notifications please following guide.
Android
The 2016 Google I/O announced major improvements to their amazing product – Firebase – a cloud platform with a lot of amazing features for mobile app developers. One of them is Firebase Cloud Messaging (FCM) — a cross-platform messaging solution that lets users reliably deliver messages at no cost. At Comelit Group we extensively use the Firebase services.
To let your app receive push notifications from the Comelit Group door entry system through FCM you need to create a project on the FCM console and send a key tied to your project service account and your app's Application ID to the Comelit Group technical support.
Here a link explaining how to create a project on the Firebase console.
After creating your project on FCM console, you need to generate and send to the Comelit Group technical support a key tied to your service account. You can create a new key in the following way:


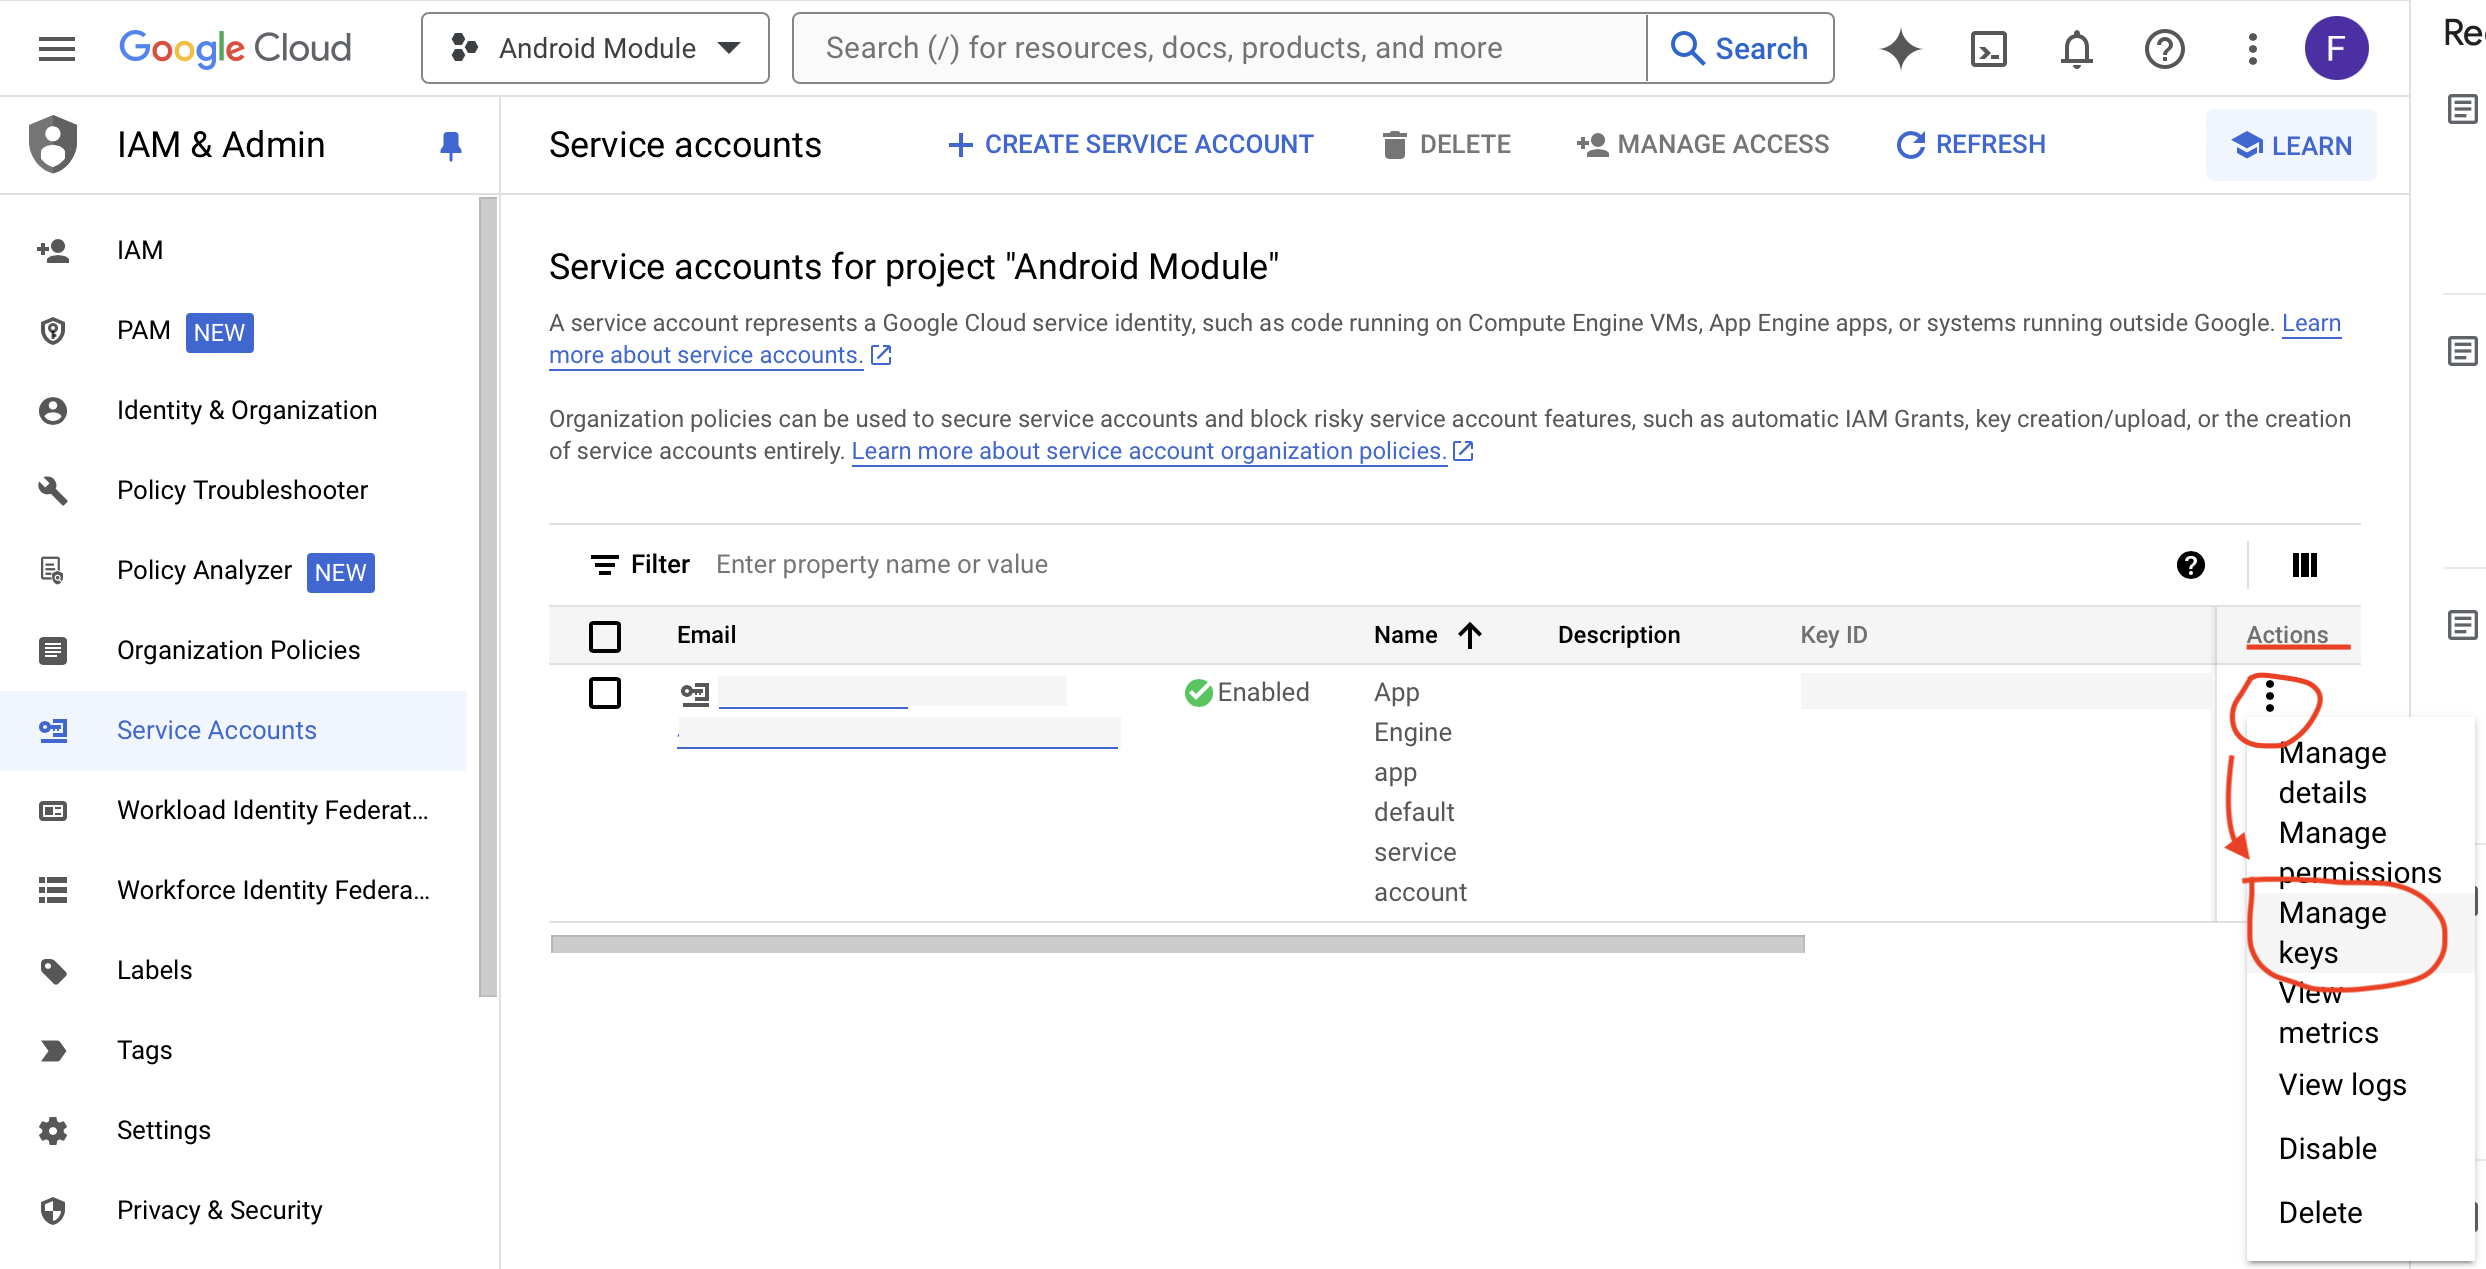
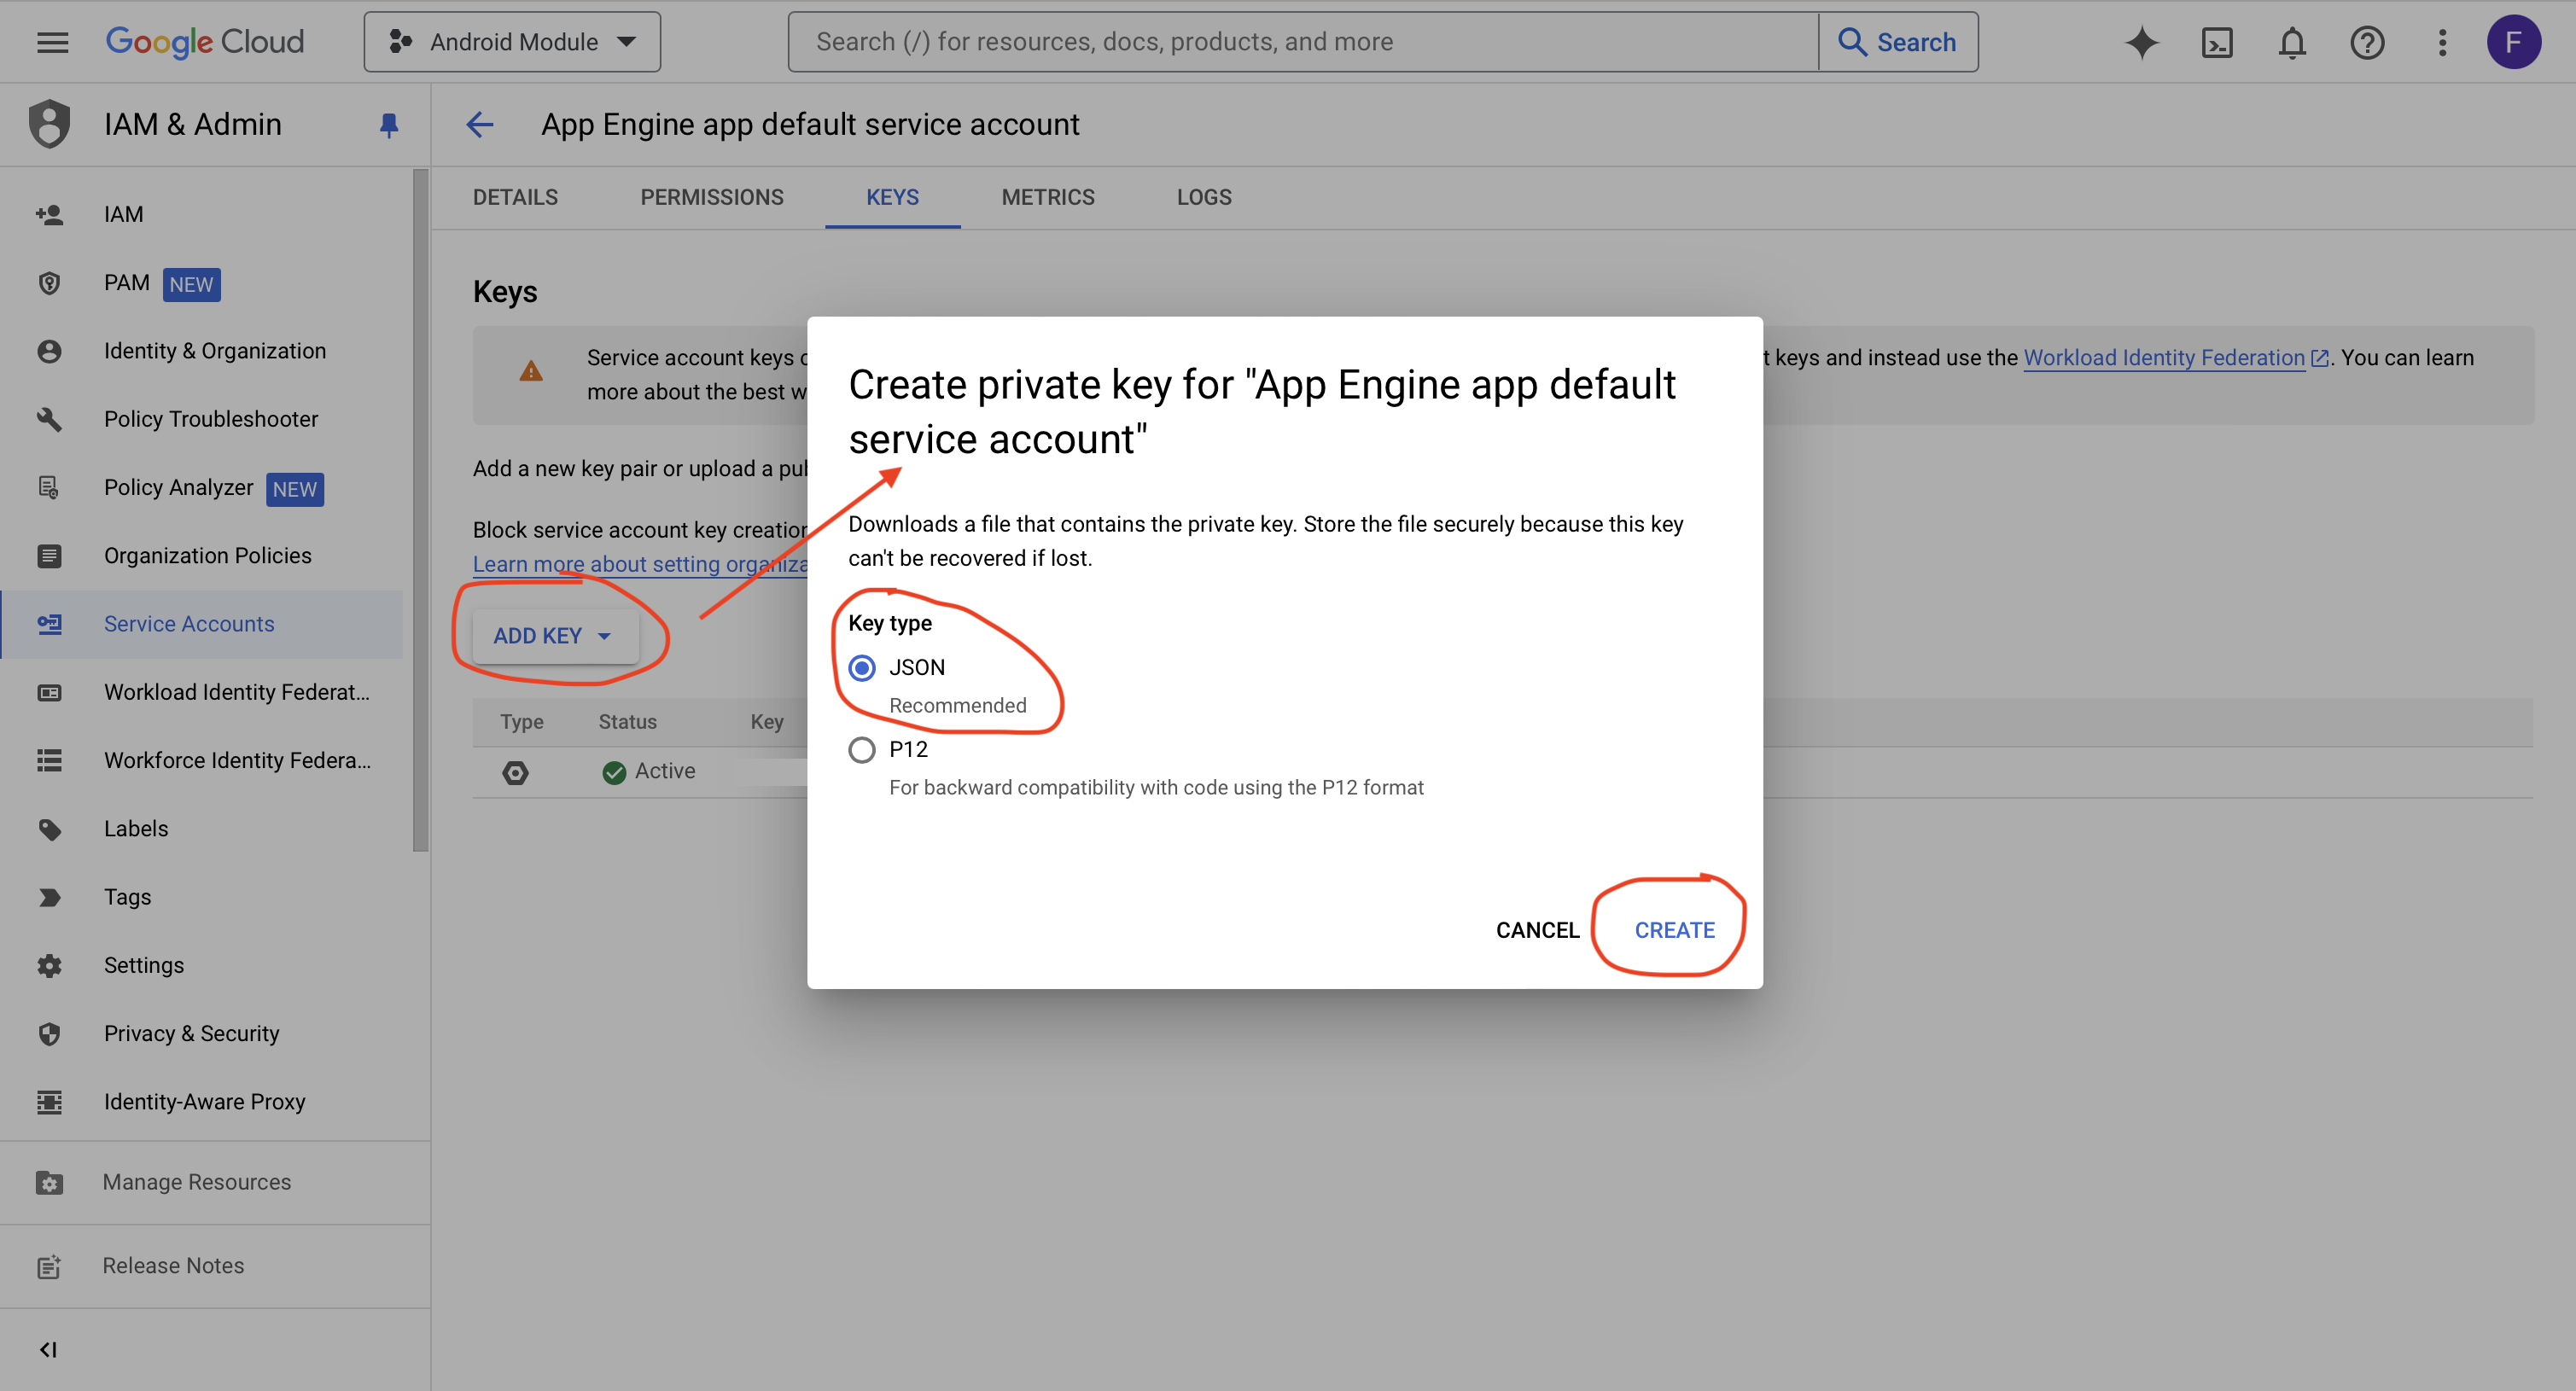
You then need to send it to the Comelit Group technical support along with your app id (for example, com.example.yourappname)
Finally, you need to setup the google-services.json file (which you download from the firebase console) in your build.gradle script file with a few configuration parameters.
- Open Android Studio and modify your build.gradle files to use the Google services plugin.
 .
.
buildscript {
  dependencies {
    classpath 'com.google.gms:google-services:3.1.0' // Add this line
  }
}

allprojects {
    repositories {
        jcenter()
        ...
        maven {
            url "https://maven.google.com"
        }
    }
}
- Update the project-level build.gradle (the one in your project folder)
//Add this line to the bottom of the build.gradle file
apply plugin: 'com.google.gms.google-services'
- Update the app-level build.gradle (the one in your project/your app-module)
dependencies {
  compile 'com.google.firebase:firebase-messaging:11.2.2'
}
- Add Firebase related dependencies under dependencies in the build.gradle file.
public class MyFirebaseMessagingService extends FirebaseMessagingService {
 private static final String TAG = "FCM Service";
 @Override
    public void onMessageReceived(RemoteMessage remoteMessage) {
        // To forward the push notifications received to the
        //Comelit Group integration library use the following method
        CGModule.getInstance(context).handlePushNotification(remoteMessage);
        ...
    }
}
- To be able to receive any notification in your app, you should add a service which extends FirebaseMessagingService.
<service android:name=".MyFirebaseMessagingService">
            <intent-filter>
                <action android:name="com.google.firebase.MESSAGING_EVENT"/>
            </intent-filter>
        </service>
- Then add it into the AndroidManifest.xml file.
public class FirebaseIDService extends FirebaseInstanceIdService {
    private static final String TAG = "FirebaseIDService";

    @Override
    public void onTokenRefresh() {
        // Get updated InstanceID token.
        String refreshedToken = FirebaseInstanceId.getInstance().getToken();
        Log.d(TAG, "Refreshed token: " + refreshedToken);

        storeToken(refreshedToken);
    }

    /**
     * Persist token to third-party servers.
     *
     * Modify this method to store the token. The token will be used to initialize the
     * Comelit Group integration library. The update of the token has to be maintained by your application.
     *
     * @param token The new token.
     */
    private void storeToken(String token) {
        SharedPreferences sharedpreferences = getSharedPreferences(getString(R.string.preference_file_key), Context.MODE_PRIVATE);
        SharedPreferences.Editor editor = sharedpreferences.edit();
        editor.putString("token", token);
        editor.commit();
    }
}
- Add a service that extends FirebaseInstanceIdService.
<service android:name=".FirebaseIDService">
            <intent-filter>
                <action android:name="com.google.firebase.INSTANCE_ID_EVENT"/>
            </intent-filter>
        </service>
- Add it into the AndroidManifest.xml file, this makes sure that the service is loaded.
iOS
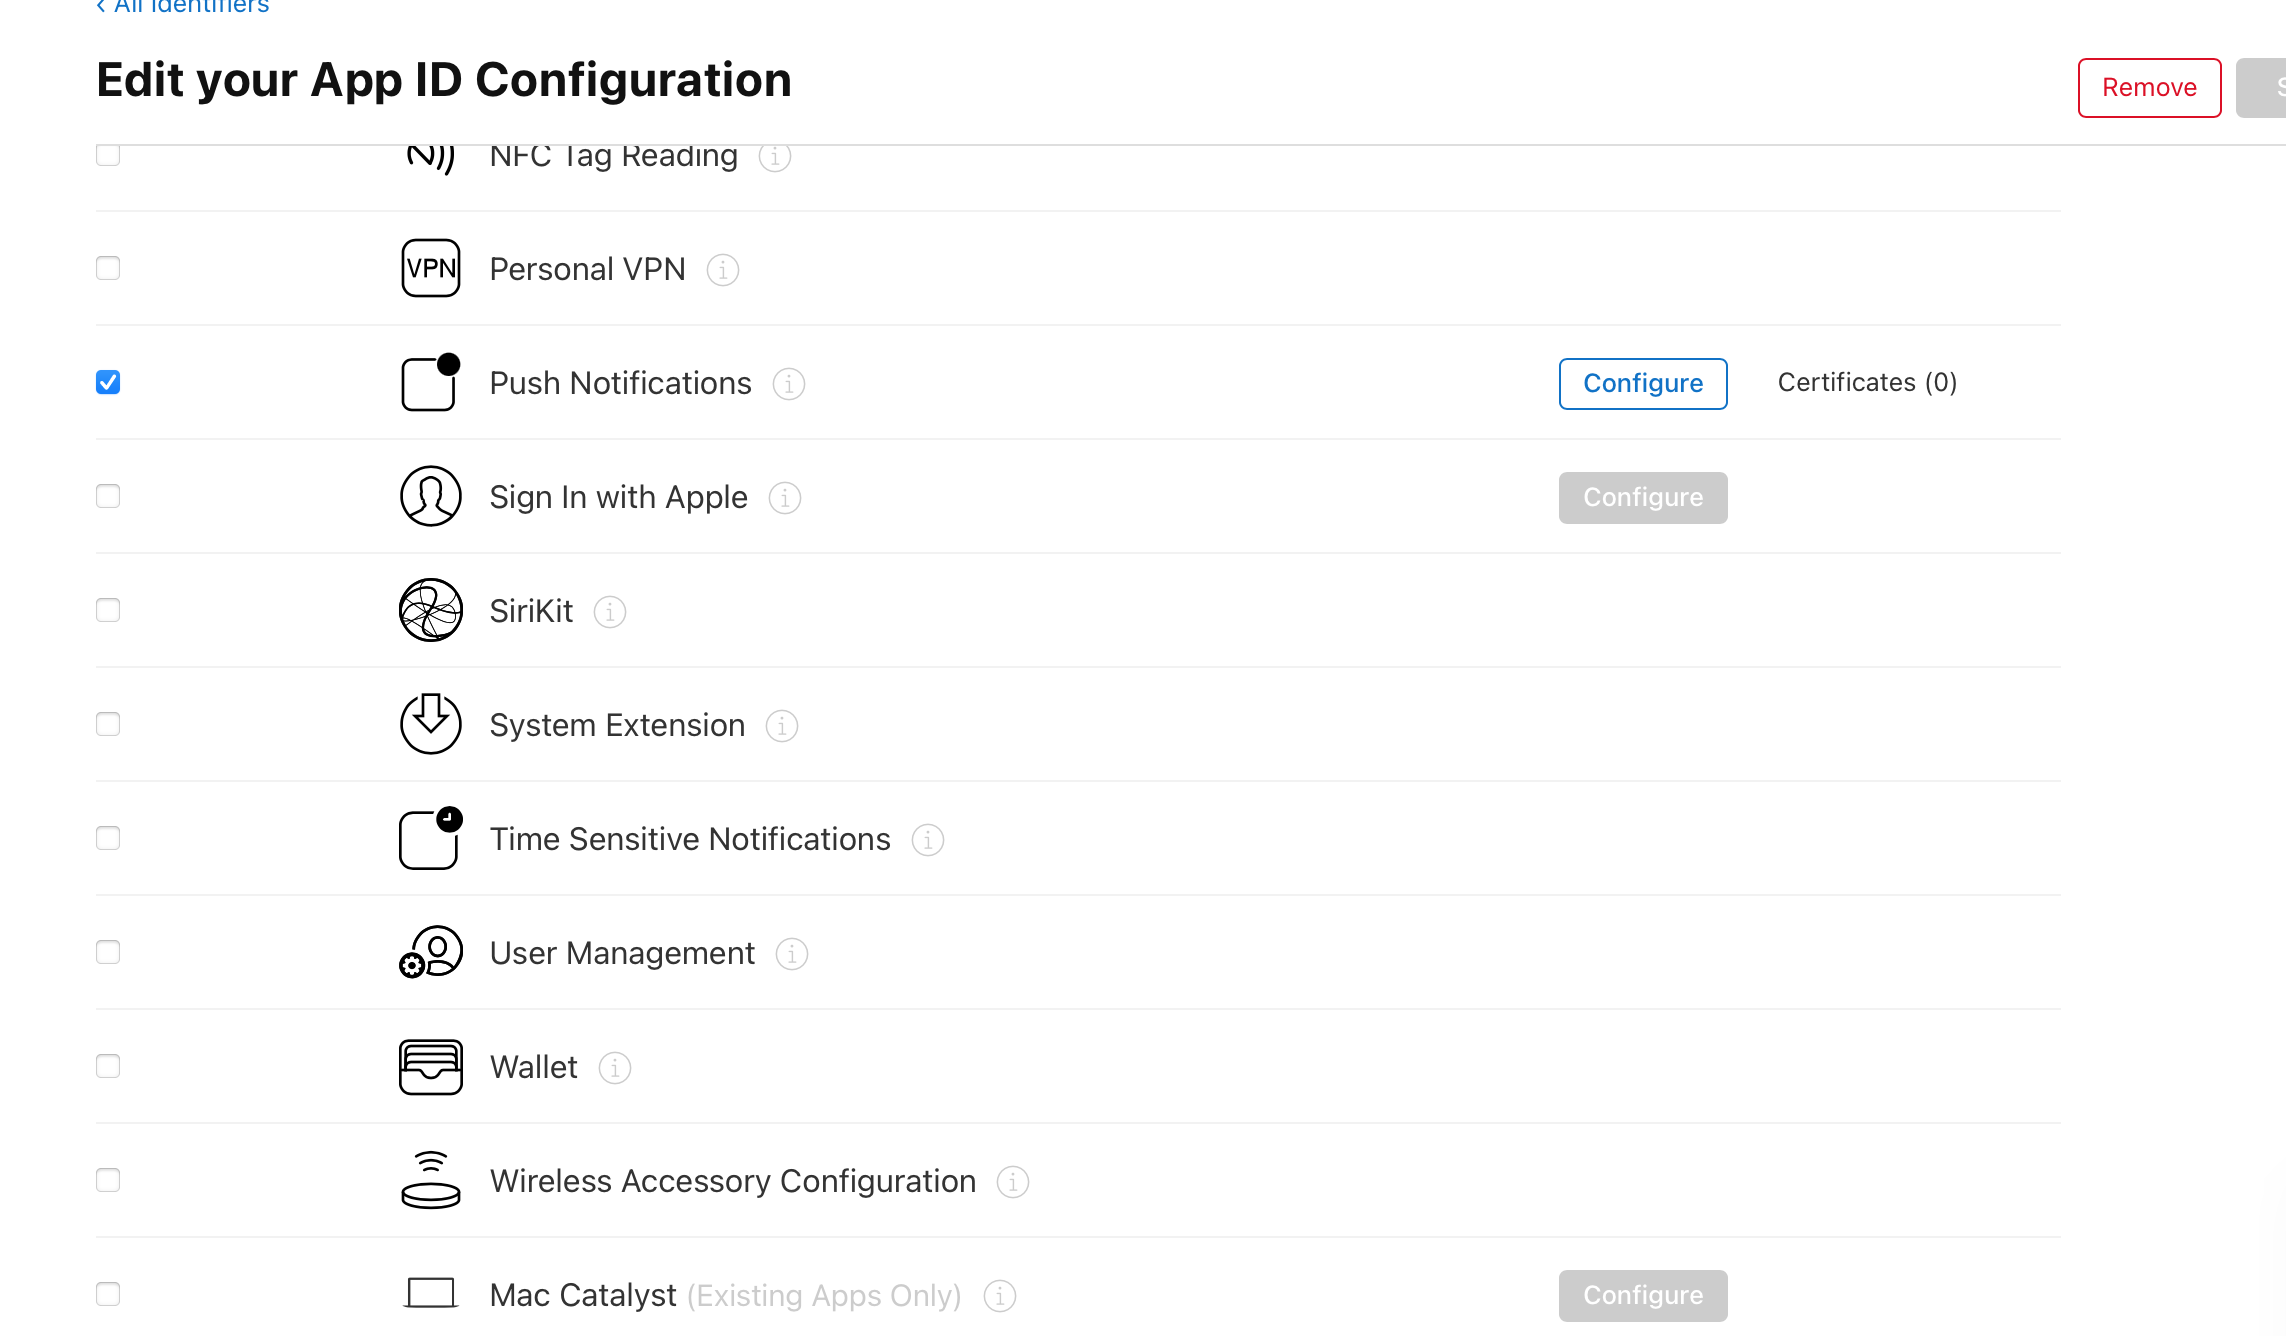
To let your iOS app receive Voip push notifications we need an APNS Key, a keyId and your team ID.
You can create a key from apple developer console
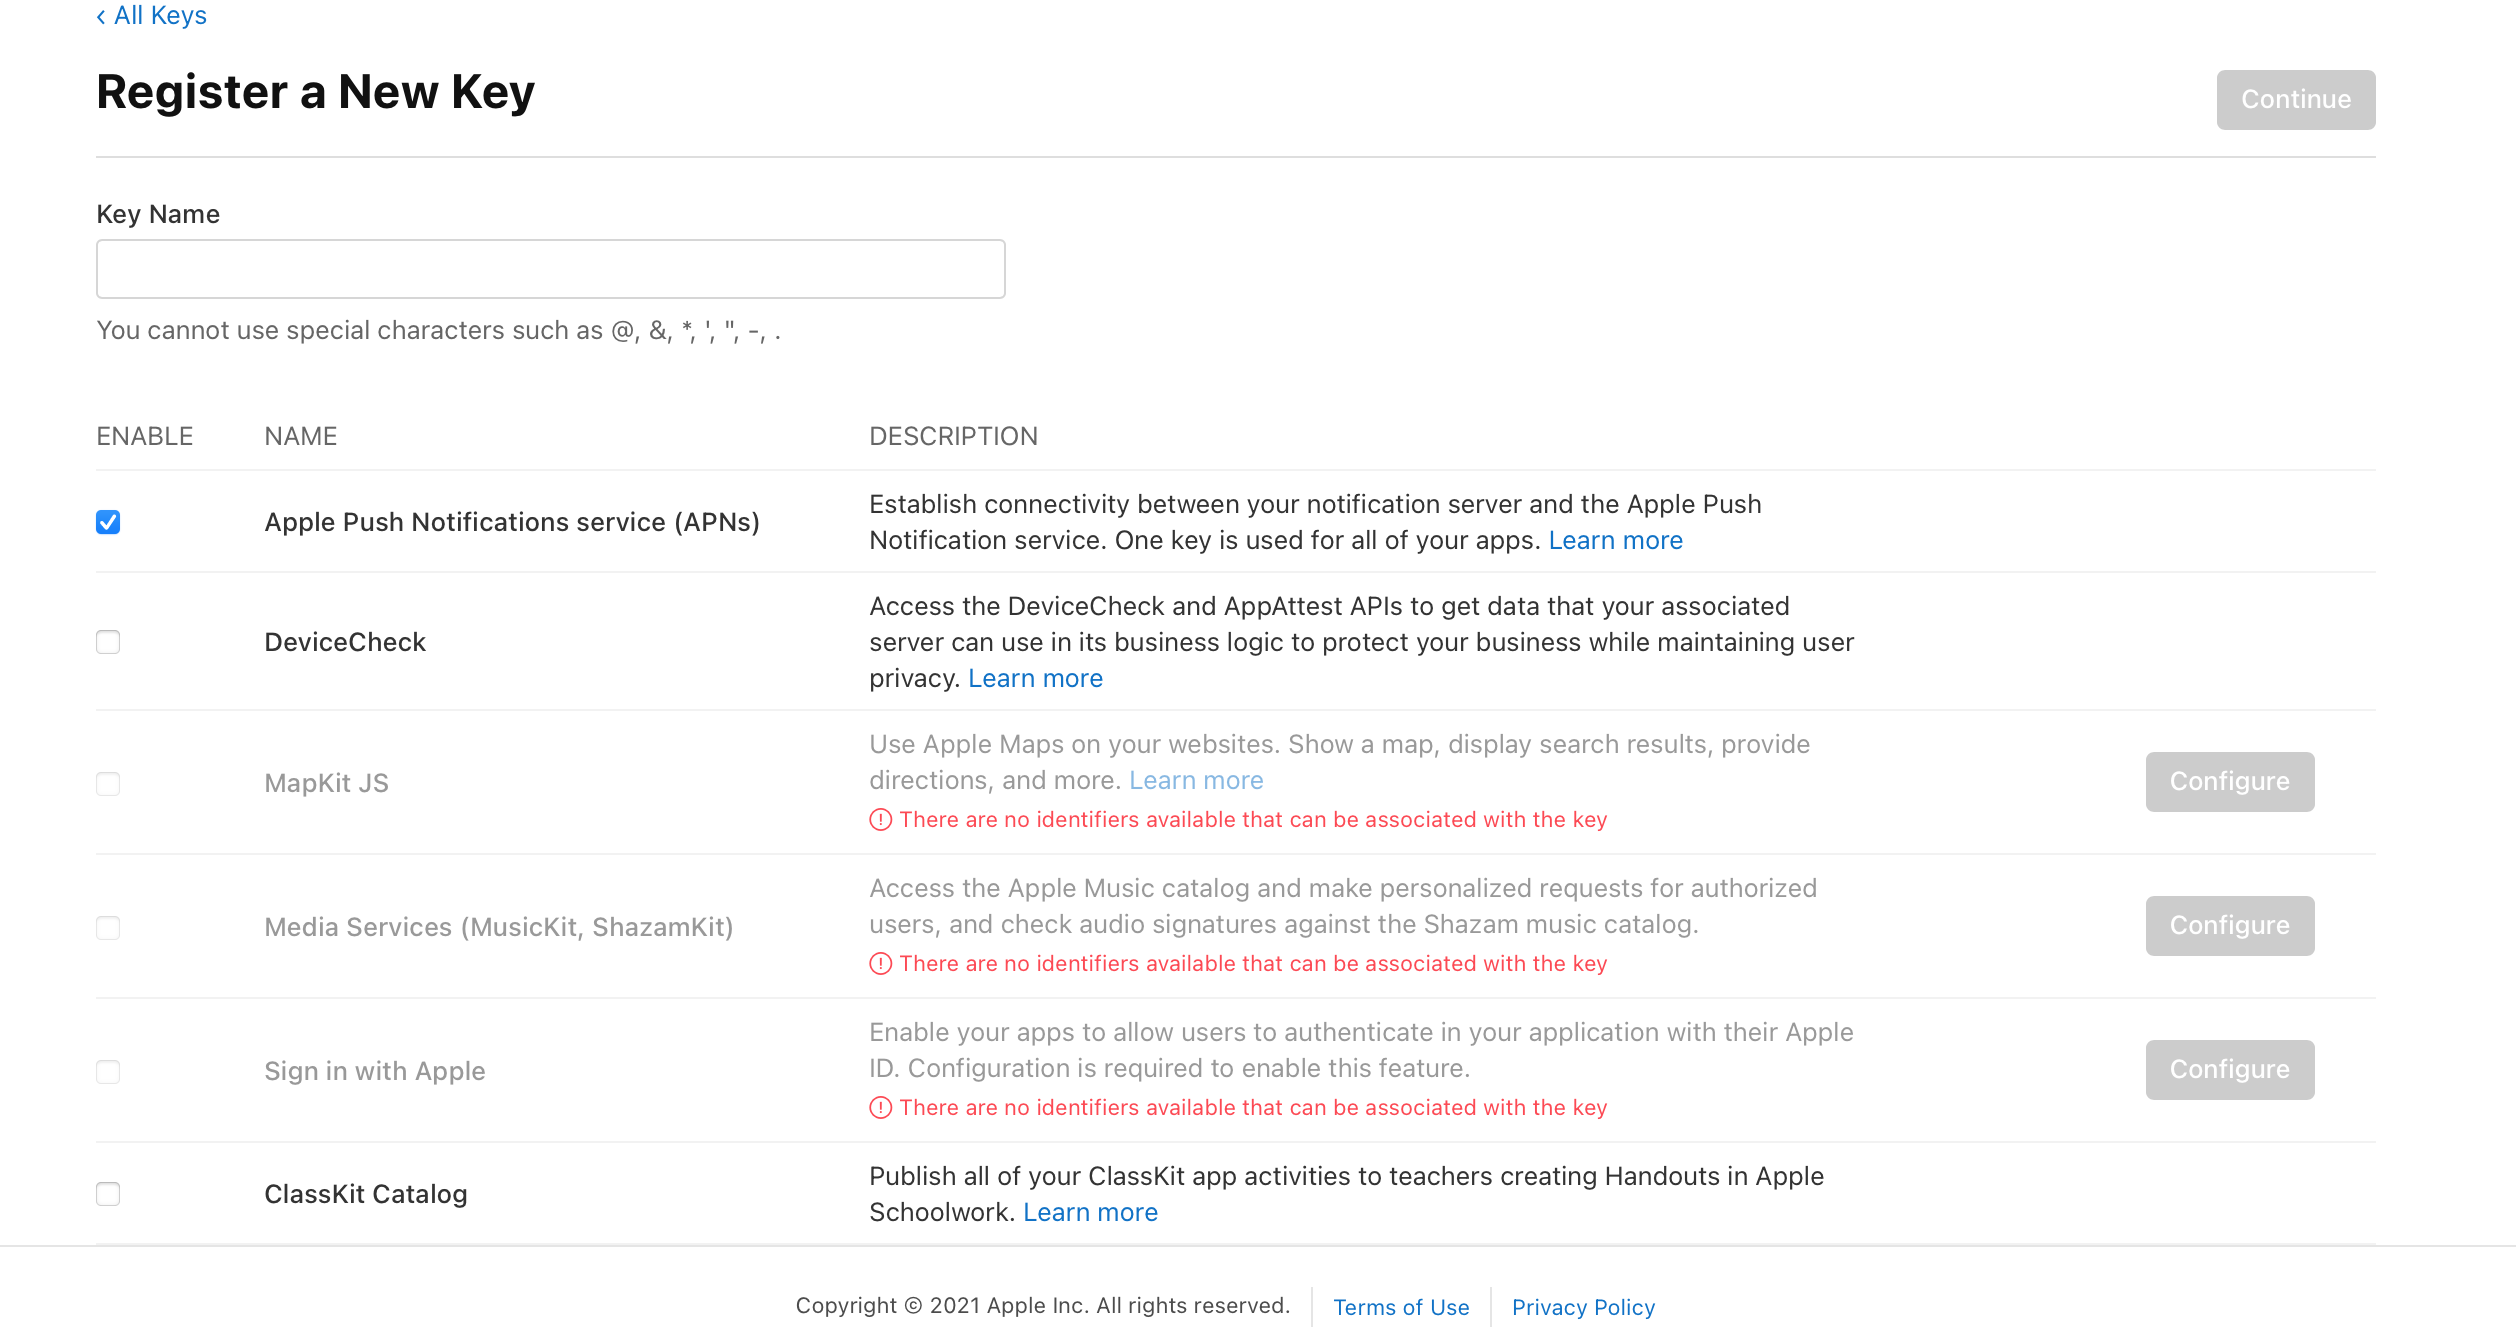
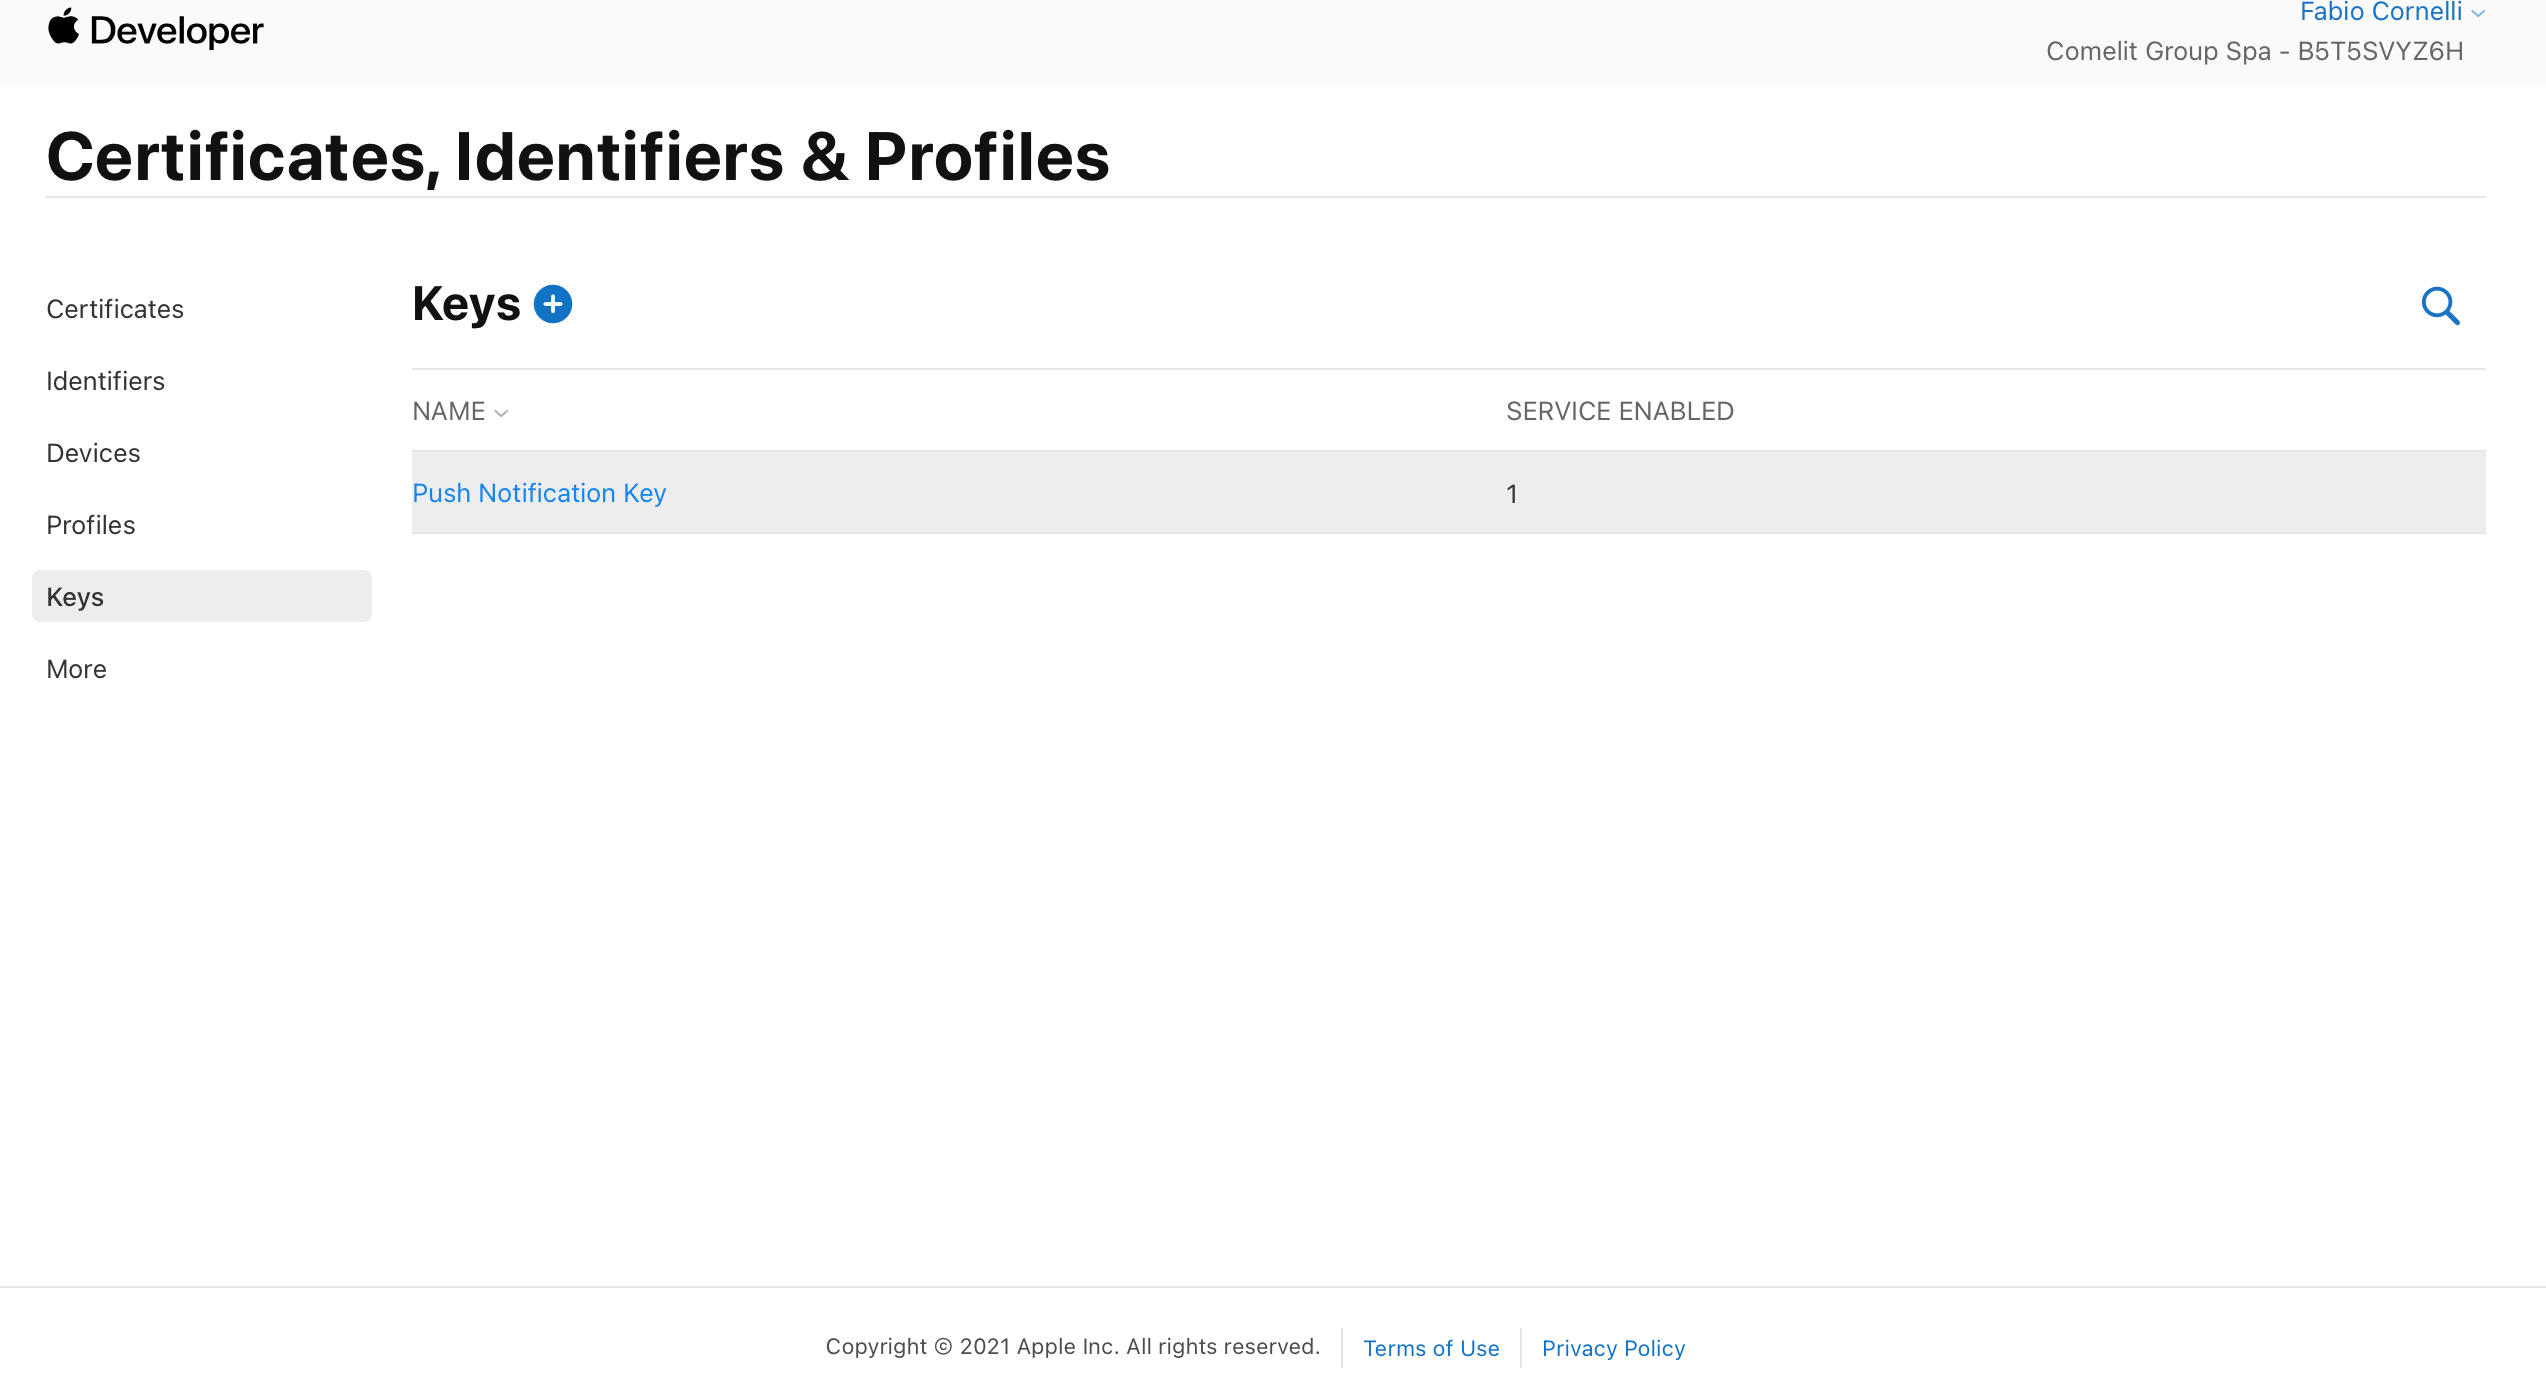
In addition all that is needed is a simple modification of your app Capabilities file.
Like all apps that support background operation, your VoIP app must have background mode enabled in the Xcode Project > Capabilities pane. Select the checkbox for Voice over IP.
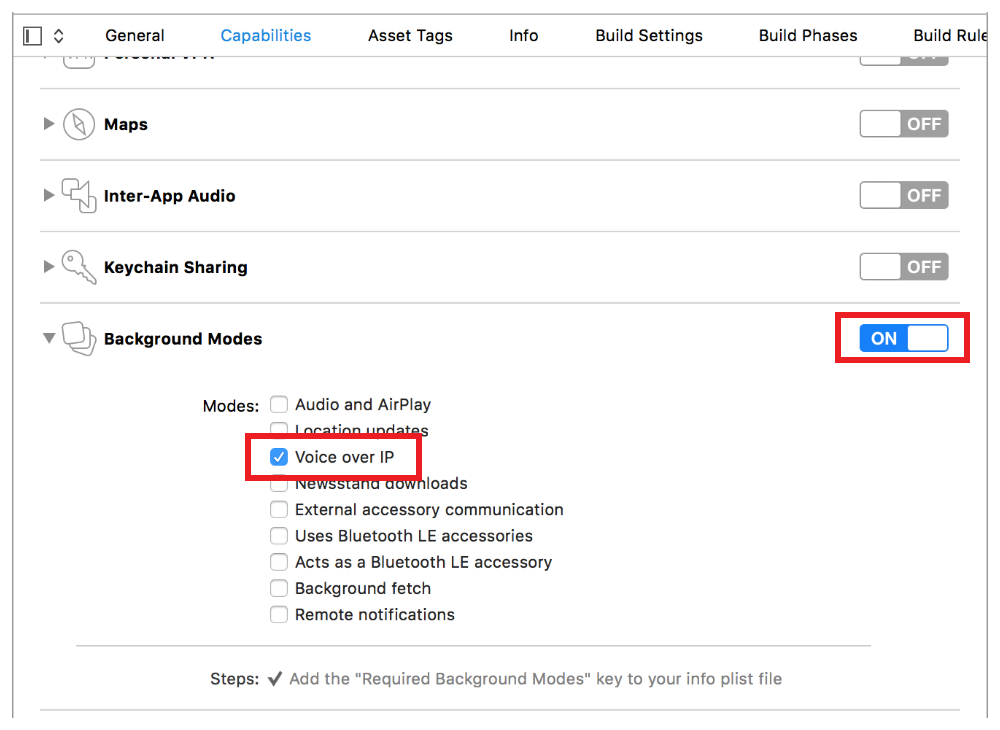
Make sure that your bundle id is registered for push notification in apple developer console (you can check in identifiers)
// Link to the PushKit framework
#import <PushKit/PushKit.h>


// Trigger VoIP registration on launch
- (BOOL)application:(UIApplication *)application didFinishLaunchingWithOptions:(NSDictionary *)launchOptions {
  [self voipRegistration];
  return YES;
}

// Register for VoIP notifications
- (void) voipRegistration {
  dispatch_queue_t mainQueue = dispatch_get_main_queue()
  // Create a push registry object
  PKPushRegistry * voipRegistry = [[PKPushRegistry alloc] initWithQueue: mainQueue];
  // Set the registry's delegate to self
  voipRegistry.delegate = self;
  // Set the push type to VoIP
  voipRegistry.desiredPushTypes = [NSSet setWithObject:PKPushTypeVoIP];
}
- To configure your app to receive VoIP push notifications, link to the PushKit framework in your app delegate (or some other location in your app). Then, create a PKPushRegistry object, set its delegate to self, and register to receive VoIP pushes.
// Handle updated push credentials
- (void)pushRegistry:(PKPushRegistry *)registry didUpdatePushCredentials: (PKPushCredentials *)credentials forType:(NSString *)type {
  // Register VoIP push token (a property of PKPushCredentials) with server
}
- Next, implement a delegate method to handle updated push credentials. If your app receives both standard push notifications and VoIP pushes, then your app will receive two separate push tokens. Only the VoIP token must be passed to the server in order to receive notifications.
// Handle incoming pushes
- (void)pushRegistry:(PKPushRegistry *)registry didReceiveIncomingPushWithPayload:(PKPushPayload *)payload forType:(NSString *)type {

  [[CGModule sharedManager] handlePushNotification:payload forType:type];

}
- Finally, set up a delegate method to process pushes. If your app isn’t running when the push is received, your app will be launched automatically.
Getting started
Perform the Comelit Group initializations during bootstrap of your app or in your main activity.
public class HomeActivity extends AppCompatActivity implements CGCallbackInt {

  @Override
    public void onCreate() {
      super.onCreate(savedInstanceState);
      setContentView(R.layout.activity_home);

      CGParameter parameters = new CGParameter.CGParameterBuilder(HOSTNAME, PORT, ACTIVATION_CODE).
                        setConnectionCallback(callback).
                        setPushToken(token).
                        useComelitUI(withUI).
                        build();
    ...
  }
  ...
}
@implementation AppDelegate

- (void)applicationWillEnterForeground:(UIApplication *)application {

        [_comelitHandler connect:[CMGParameter makeWithBuilder:^(CMGParameterBuilder* builder){
        builder.hostname = ip;
        builder.port = [port intValue];
        builder.activationCode = actCode;
        builder.pushToken = token;
        builder.callback = self.callbackReceiver;
        builder.debug = YES;
        builder.withUI = NO;
    }]];
}
...
@end
The Comelit Group library provides a single API for initialization. To initialize the Comelit SDK third party developers have to create a 'CGParameter' object using the builder pattern. The constructor of this object receives three parameters:
| Parameter | type | Description |
|---|---|---|
| Hostname | TEXT | Or ip address used to identify the Comelit Group door entry system in the internet. |
| Port | INT | Used to communicate with the MUG (usually 64100). |
| Activation code | TEXT | a six digits used to autenticate a user against the Comelit Group door entry system. |
A set of methods can then be used to instrument the CGParameter object.
| Method | parameter | Description |
|---|---|---|
| setConnectionCallback | CGCallbackInt | Callback used to receive the result of the initialization process (see below for more info). |
| setPushToken | TEXT | Used by Firebase or Apple APN to send push notitifcations to a device. |
| useComelitUI | BOOL | True means that the 'call screen' will be the one provided by the Comelit SDK, otherwise the developer can use its own 'call screen'. |
| setAlertTime | INT | Specify the time to maintain the alerting state. |
| setConnTimeForExternalUnit | INT | Specify the time to stay in connection with an external unit. |
| setConnTimeForInternalUnit | INT | Specify the time to stay in connection with an internal unit. |
| setCloseTime | INT | Specify the time to wait, before close the communication, after sending the opendoor action during a communication. |
@Override
    public void onConnect() {
        Log.i(TAG, "A connection was successfully established.");
        ...
    }

@Override
    public void onDisconnect() {
        Log.i(TAG, "A Disconnection has complete.");
        ...
    }

@Override
    public void onError(CGError error) {
      switch (error) {
        ...
      }
    }
-(void) onConnect
{
  NSLog(@"A connection was successfully established.");
  ...
}

-(void) onError:(CGError)error
{
  switch (error) {
  ...
  }
}
To be notified about the connection status a 3rd party app has to set a callback during the initialization of the Comelit Group library. The result of the connection will trigger one of the following methods.
| Method | Description |
|---|---|
| onConnect() | If the connection to the MUG was successfully this method will be fired. |
| onDisconnect() | Notify that the disconnection from the MUG has complete. |
| onError(CGError error) | If during the connection an error occur this method will be triggered. |
The CGError parameter identifies one of the following errors:
| Code | Description |
|---|---|
| CG_GENERIC_ERROR (0) | An error occured internally. |
| CG_CONNECTION_ERROR (1) | Unable to make a connection, the ip and/or port are wrong. |
| CG_ACTIVATION_CODE_ERROR (2) | The activation code given as parameter to the Comelit Group library is not valid. |
Call Start event
A 3rd party app use the setCallStartReceiver method to register an object to be notified about the start of a call.
The CGCallStartReceiver provides an interface used to notify the start of a call:
| Method | Description |
|---|---|
| setCallStartReceiver | set the receiver for the onCallStartEvent |
| onCallStart | notify when a call is started. Furthermore, this method provides information about a) the direction of a call (ingoing or outgoing), b) the name of the calling object (e.g., external unit), c) a set of flags used to identify if the call is a priority call or not and d) a boolean flag indicating if it's a floor call (this parameter can be safely ignored for now). |
Call events
A 3rd party app can also use the setCallEventCallback method to register an object to be notified about every events during a call.
The CGCallEventCallback provides a set of callbacks used to notify events outside the Comelit SDK. Here a list:
| Method | Description |
|---|---|
| setCallEventCallback | set the receiver for the call events |
| onCallEnd | notify when a call is ended. |
| onCallPause | (for Android) notify if the activity was paused. |
| onCallResume | (for Android) notify if the activity was resumed. |
| onCallCapabilityDoor | notify that the calling object has the opendoor capability. |
| onCallCapabilityAudio | notify that the calling object has the audio capability. |
| onCallCapabilityPeerType | notify the type of calling object (e.g., external unit, internal unit) |
| onCallToggleAnswer | notify when the user pick up / hang up the call. |
| onCallRelease(CGCallReleaseType cause) | notify if the call was ended by an external cause. |
| onCallRequestVideo | notify when the user click the steal video icon. |
| onCallOpenDoor | notify when the user click key button in order to send the opendoor command. |
| onCallToggleMic | notify when the user click the mute icon. |
| onCallStartRec | notify when the user click the recording icon (not exposed to third party). |
| onCallStopRec | notify when the user click the recording icon to stop it (not fully supported for third party yet). |
| onCallVirtualButton1 | notify when the user click the virtual button P1 icon (not fully supported for third party yet). |
| onCallVirtualButton2 | notify when the user click the virtual button P2 icon (not fully supported for third party yet). |
| onCallFirstFrame | notify when the first frame has been successfully decoded. |
Release type
This enumerator describes the release cause for a call that you receive in the onCallRelease call event:
| Value | Description |
|---|---|
| CALL_RELEASE_NORMAL | notify that the call was ended by the other peer. |
| CALL_RELEASE_TIMEOUT | notify that the call was ended by timeout. |
| CALL_RELEASE_REJECTED | notify that the call was rejected by the library. |
| CALL_RELEASE_DIVERTED | notify that the call was diverted by the library. |
| CALL_RELEASE_DEVICE_NOT_FOUND | notify that the call was ended due to an internal error in the library. |
| CALL_RELEASE_SYSTEM_BUSY | notify that the call was ended due to an internal error in the library. |
| CALL_RELEASE_NOT_SELECTED | notify that the call was ended because someone else answered. |
| CALL_RELEASE_ERROR | notify that the call was ended due to a connection error. |
Address book
All the elements inside the Comelit Group door entry system are stored inside an address book. The address book element is represented by two attributes:
| Parameter | type | Description |
|---|---|---|
| id | TEXT | Unique identifier of the element inside the Comelit Group door entry system. |
| name | TEXT | A human readable name specified during the setup of the Comelit Group door entry system. |
For simplicity the two attributes are wrapped in a class named CGAddrBookElement. Thus you have to deal just with CGAddrBookElement instances for getting address book elements.
There are six types of address book elements:
- External unit
- Internal unit
- Switchboard (or CPS or Portier)
- Camera
- Opendoor
- Actuator
External unit
To retrieve all the external units in the Comelit Group door entry system.
List<CGAddrBookElement> externalUnitElements = CGModule.getInstance(getApplicationContext()).getExternalUnitAddressBook();
NSArray* externalUnitElements = [CGModule sharedManager] getExternalUnitAddressBook];
External units represent a Comelit entrance panel (i.e., outdoor audio and audio/video door entry monitor). Here for a full overview.
List of compatible Outdoor entrance panels:
- Quadra
- 3one6
- Ikall
- Roma
- Vandalcom
- Emergency
- Architectus Pro
Internal unit
To retrieve all the internal units in the Comelit Group door entry system.
List<CGAddrBookElement> internalUnitElements = CGModule.getInstance(getApplicationContext()).getInternalUnitAddressBook();
NSArray* internalUnitElements = [CGModule sharedManager] getInternalUnitAddressBook];
Internal units represent Comelit internl monitor (i.e., indoor audio and audio/video door entry monitor).
Here for a full overview.
List of compatible Indoor monitors:
- Mini
- Icona
- Planux Lux
- Style
- EasyCom
- Maxi
Switchboard
The Comelit Group integration library is compatible with desk mounted audio-video porter switchboard.
To retrieve all the switchboards in the Comelit Group door entry system.
List<CGAddrBookElement> switchboardElements = CGModule.getInstance(getApplicationContext()).getSwitchboardAddressBook();
NSArray* switchboardElements = [CGModule sharedManager] getSwitchboardAddressBook];
Camera
IP Camera. TBD.
To retrieve all the cameras in the Comelit Group door entry system
List<CGAddrBookElement> ipCameraElements = CGModule.getInstance(getApplicationContext()).getCameraAddressBook();
NSArray* ipCameraElements = [CGModule sharedManager] getCameraAddressBook];
Opendoor
The door entry panel has two relays onboard. If they are configured inside the MUG you can manage them from your app.
To retrieve all the opendoors in the Comelit Group door entry system
List<CGAddrBookElement> opendoorElements = CGModule.getInstance(getApplicationContext()).getOpendoorAddressBook();
NSArray* opendoorElements = [CGModule sharedManager] getOpendoorAddressBook];
Actuator
If your app would like to send commands to a Comelit device like the 1443.
To retrieve all the actuators in the Comelit Group door entry system
List<CGAddrBookElement> actuatorElements = CGModule.getInstance(getApplicationContext()).getActuactorAddressBook();
NSArray* actuatorElements = [CGModule sharedManager] getActuactorAddressBook];
Send an action
CGResponse response = CGModule.getInstance(getApplicationContext()).call("ID");
CGResponse response = [CGModule sharedManager] call:@"ID"];
To open a door or send a command to an actuator a generic API, named call, is provided.
Make a call
A single API is provided to make call
CGResponse response = CGModule.getInstance(getApplicationContext()).call("ID");
CGResponse response = [CGModule sharedManager] call:@"ID"];
Thanks to the clean API making a call is straightforward. As you can see you can use the same API you used to send a command to an Opendoor (or Actuator).
Result code summary:
| Code | Description |
|---|---|
| DONE (0) | Everything worked as expected. |
| GENERIC_ERROR (1) | Unable to make a call. |
| NOT_CONECTED_YET_ERROR (2) | The app is not connected to the Comelit Group door entry system. |
Receive a call
Thank to the setup performed here your app, at this point, is able to receive push notitifications from a Comelit Group door entry system and forward this notification to the Comelit Group library.
Thus, the library will take care to connect to the Comelit Group door entry system and initiate the call.
Disconnect
Thanks to the use of push notifications if your app will go in background the Comelit Group library must be shutdown.
@Override
protected void onPause() {
  CGModule.getInstance(getApplicationContext()).disconnect();
  super.onPause();
}
- (void)applicationDidEnterBackground:(UIApplication *)application {
  [[CGModule sharedManager] disconnect];
}
Customize call screen
This section is intended to provide advanced information about the integration of the Comelit SDK into a third party application letting the third party creates its own 'call screen' and use APIs to inject events to the Comelit SDK.
Architecture
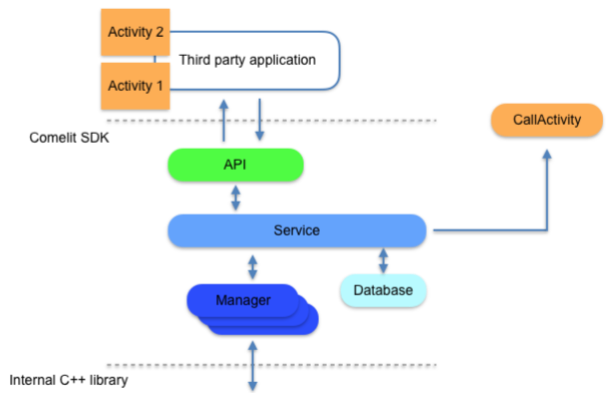
The architecture used until Comelit SDK version 0.2.x is shown below:
Starting from version 0.3.0 the architecture was modified to let third party applications to use its own call screen. Below an image of the new architecture.
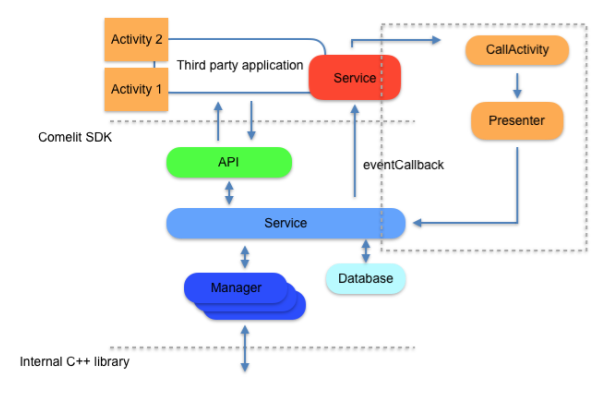
The new architecture was adapted to adhere to the Model-View-Presenter pattern and a new component, named 'CGPresenter', was introduced. In this way the call screen can be implemented by third party developers and in order to communicate with the Comelit SDK uses the CGPresenter instance.
An Android and iOS application example was created. Please ask to your Comelit contact to give access to these examples.
Call presenter
In order to be able to use your own call screen, you need to retreive from the Comelit SDK a presenter for the call.
//in your activity you can retrieve the current prenenter with this API
CGPresenter presenter = CGModule.getInstance(this).getCurrentPresenter();
//in your controller you can retrieve the current prenenter with this API
CGPresenter *presenter = [[CGModule sharedManager] getCurrentPresenter];
The presenter allows you to send various commands while a call is in progress. (e.g answer the call, open the door, release the call etc..)
//********** after you have retrieved the presenter, you can call the following methods to perform different actions ********

//activity lifecycle, you should call it in your corresponding lifecycle methods
void onResume();
void onPause();

//IMPORTANT: you should call this method when your CGCallEventCallback has been set (the CGCallEventCallback could be your call activity or another component)
void onCallEventReceiverReady();

//ui actions
void toogleAnswerCall(); //this method should be call to answer / hang up the call
void toogleMute(); //this method is to mute/unmute the app microphone after the call has been answered
void openDoor(); //this method is to open the door and let the caller in
void release(); //this method is to release the call

//this method is to steal the video from other apps (during a call, only app #1,#2,#3 will receive the video immediatly other apps should steal the video)
void onStealVideoButtonPressed();

//IMPORTANT : you should call this method to start receiving  video (i.e. your call screen has to implement CGVideoReceiver interface)
void setVideoReceiver(CGVideoReceiver videoReceiver);
//after you have retrieved the presenter, you can call the following methods to perform different actions

//ui actions
-(void)toggleAnswerCall; //this method should be call to answer / hang up the call
-(void)toggleMute; //this method is to mute/unmute the app microphone after the call has been answered
-(void)openDoor; //this method is to open the door and let the caller in
-(void)releaseCall; //this method is to release the call

//this method is to steal the video from other apps (during a call, only app #1,#2,#3 will receive the video immediatly other apps should steal the video)
-(void)onStealVideoButtonPressed;

//IMPORTANT : you should call this method to start receiving  video (i.e. your call screen has to implement CGVideoReceiver protocol)
-(void)setVideoReceiver:(id<CGVideoReceiver>)receiver;

//IMPORTANT : you should call this method to setting up the audio inside the SDK,
//the app must be already in foreground (or the system won't allow the setup)
//you should call it in viewWillAppear of your controller
-(void)setupAudio;
Once your call screen gets the presenter it can call its method to respond to user interaction (tap on the open door button --> call the openDoor method of the presenter) For each action performed by the presenter your CGCallEventCallback will receive an event (the CGCallEventCallback could be the call screen itself or not, it's up to you) and you can update your call screen according to that event.
Whenever there is a new call your CGCallStartReceiver will receive the event and you can start your call screen
//**************** launch your call screen when your CGCallStartReceiver receives onCallStart event ******************
@Override
public void onCallStart(String caller, CallFsmStatusChangeEvt.CallDirection callDirection, LinkedList<CallFlag> linkedList, boolean isFloorCall) {
    Intent intent = new Intent(context,ExternalUICallActivity.class);
    intent.putExtra(EXTRA_SOFTWARE_DECODE,softwareDecode);
    intent.putExtra(EXTRA_CALL_CALLER_NAME,caller);
    intent.putExtra(EXTRA_CALL_DIRECTION,callDirection);
    context.startActivity(intent);
}
//launch your call viewController when you receive onCallStart event
- (void)onCallStartWithName:(NSString *)name andDirection:(CMGCallDirection)direction
{
    dispatch_async(dispatch_get_main_queue(), ^{
        UIViewController *externalCallVc = [[ExternalUIExample alloc] initWithCallerName:name andDirection:direction];
        [self presentViewController:self.externalCallVc animated:NO completion:nil];
    });
}
Technical Alarm
Technical alarm push notification could be received, with customizable descriptions if configured. This feature is only available if the third-party app is registered to a Comelit device compatible with Technical Alarm.
Push Notification Format
The push notification message is structured as follows:
| Parameter | type | Description |
|---|---|---|
| event | TEXT | type of event. For technical alarms the type is "technical_alarm". |
| notification | TEXT | Containing a json object which can be parsed to get the parameters title and body. |
| notification.body | TEXT | Notification body. This message is configured on the compatible Comelit device and contains the description of the technical alarm. |
public class MyFirebaseMessagingService extends FirebaseMessagingService {

 @Override
    public void onMessageReceived(RemoteMessage remoteMessage) {
        ...
        String event = remoteMessage.getData().get("event");
        String notification = remoteMessage.getData().get("notification");
        try {
            JSONObject notificationJobj = new JSONObject(notification);
            if (notificationJobj != null) {
                String body = notificationJobj.optString("body");
            }
        } catch (JSONException e) {
            e.printStackTrace();
        }
        ...
    }
}
- (void)application:(UIApplication *)application didReceiveRemoteNotification:(NSDictionary *)userInfo fetchCompletionHandler:(void (^)(UIBackgroundFetchResult))completionHandler
{
    NSDictionary *apsContent = [userInfo objectForKey:@"aps"];
    NSDictionary *dataContent = [userInfo objectForKey:@"data"];

    NSString *body = [[apsContent objectForKey:@"alert"] objectForKey:@"body"];
    NSString *event  = [dataContent objectForKey:@"event"];

    ...
}
Android 10+
From android 10 and above, apps cannot start an activity from the background at will. The Comelit SDK for Android has been updated to support this scenario. Whenever there is an incoming call from a push notification, the sdk will post an heads up notification with a pending intent instead of launching the call activity directly. The Android system might decide to consume the pending intent immediately (usually on lockscreen) or to just show the heads up notification. Depending on your Comelit SDK configuration, you may need to change your app behavior.
If you are using the internal call UI you need to:
notify the sdk when your app is being open from the launcher (for example onResume() of your main activity) and call the API notifyPendingCall() this wiil allow the sdk to manage the incoming call correctly if the user opens your app instead of tapping the notification.
//**************** ask the sdk to notify any possibile pending calls when app has being opened from launcher  ******************
CGModule.getInstance(getApplicationContext()).notifyPendingCall();
All other cases are managed internally from the sdk (user tapping the notification or user releasing the call from notification etc..)
If you are using your custom call UI you need also to:
set which intent the sdk will launch when the user tap on the call notification. It should be basically the intent that you would have launched in your CGCallStartReceiver.
//**************** set the intent the sdk will launch when user tap notification for an incoming call******************
Intent intent = new Intent(getApplicationContext(), ExternalUICallActivity.class);
CGModule.getInstance(getApplicationContext()).setExternalPendingCallIntent(intent);
To retrieve the informations you would have got from onCallStart event, your activity will receive in its starting intent the following object:
//**************** Retrieve the information that are usually received  in onCallStart ******************
CGCallActivityInformation callInformation = (CGCallActivityInformation)bundle.getSerializable(CGCallActivityInformation.EXTRA_CALL_INFORMATION);
String caller = callInformation.getCallerName(); //same information of: String caller received in onCallStart
CallFsmStatusChangeEvt.CallDirection callDirecton = callInformation.getCallDirection(); //same information of CallFsmStatusChangeEvt.CallDirection callDirection received in onCallStart
Your onCallStart method will still be invoked when your app is opened (i.e. you receive an incoming call while being already connected or starting an outgoing call)
Regardless of your configuration you can call the following API to customize the Comelit SDK behavior:
//use this api to customize the call notification
CGModule.getInstance(getApplicationContext()).setCallNotificationStyle(R.drawable.your_incoming_call_icon,R.string.your_incoming_call_title,R.color.your_incoming_call_notification_background_color);

//use this api to enable/disable the internal management of the ringtone (enabled by default starting from android 10)
CGModule.getInstance(getApplicationContext()).setEnableRingtone(true);

//use this api to set your custom ringtone (by default the sdk will use the default ringtone of the smartphone)
CGModule.getInstance(getApplicationContext()).setIncomingCallRingtone(<your custom ringtone Uri>);
iOS 13+
From iOS 13 and above if you compile your application with xcode 11 or above, CallKit must be used to handle an incoming voip push notification, otherwise the app will be crashed from the system.
//edit these properties to customize the callkit UI,
//by default the name of your app and the icon of your app will be used

//custom title -> default is your app name
[CGModule sharedManager].callKitTitle = @"your custom callkit title";

//name of your icon, must be in your main bundle -> default is your app icon
[CGModule sharedManager].callKitIconName = @"your-custom-icon";

 //timeout in seconds that will wait for the call connection after receiving the push -> default 25.0
[CGModule sharedManager].callKitConnectionTimeout = 10.0;
Advances in App Background Execution
Read more about callkit and voip push notification
The CGModule takes care of this for you automatically since version 0.5.3, either if you use or not the internal UI for the incoming call. You can customize the callkit title and icon by changing the following properties of the CMGCallKitHandler
From version 0.5.x to 0.9.x
With the release of version 0.9.x of the android CGModule, your build could break. To improve the modularity of the code, some classes where moved in different packages/libraries and some where renamed. This section aims to help you in the migration (which should not be an hard work, mostly replace imports).
The first step is to add the new dependencies in your build.gradle file (see here)
Here a list of the changes:
- The class CallFsmStatusChangeEvt.CallDirection is now just CallDirection.
new package: com.comelitgroup.libcomelit.type.CallDirection - The class CallFlag has been move to another package.
new package: com.comelitgroup.libcomelit.type.CallFlag; - If you implement CGCallEventCallback somewhere in your code, you need to implement a new method: void onCallFirstFrame() (see CGCallEventCallback)
Please get in touch with us if you struggle with the migration or if you see that this section is missing some crucial step.
Advanced audio settings
The Android CGModule (from version 0.9.x) allows to fine tune some advanced audio settings.
While in most cases you shouldn't need to set these parameters (the default one should work fine), due to the vast number of devices running android, they might be useful to improve audio quality in some particular devices.
To set the advances Audio settings you should create a CGAudioSettings object using the builder pattern:
public class HomeActivity extends AppCompatActivity implements CGCallbackInt {

  @Override
    public void onCreate() {

      CGAudioSettings.CGAudioSettingsBuilder audioSettingsBuilder = new CGAudioSettings.CGAudioSettingsBuilder();

      //JUST EXAMPLE VALUES! PLEASE REFER TO PROVIDED SAMPLE APP FOR MORE DETAILS
      audioSettingsBuilder.setNativeEchoCancellation(true);
      audioSettingsBuilder.setNativeEchoLevel(3);
      audioSettingsBuilder.setNativeEchoDelay(120);
      audioSettingsBuilder.setAndroidEchoCancellation(false);
      audioSettingsBuilder.setNoiseSuppressor(true);
      audioSettingsBuilder.setLimitAmplification(32767);
      audioSettingsBuilder.setGainSpeaker(1.0);
      audioSettingsBuilder.setGainMicrophone(1.0);

      CGParameter parameters = new CGParameter.CGParameterBuilder(HOSTNAME, PORT, ACTIVATION_CODE).
                        setConnectionCallback(callback).
                        setPushToken(token).
                        useComelitUI(withUI).
                        setAudioSettings(audioSettings.build()).
                        build();
    ...
  }
  ...
}
Disable CallKit
In China CallKit cannot be used. If you need to release your app in China, you need to disable it from the Comelit SDK.
// from Apple Guidelines (June 2020)
// Chinese Ministry of Industry and Information Technology (MIIT)
// requested that CallKit functionality be deactivated in all apps available on the China App Store.
//
// to solve this issue, we cannot use VoIP notification for China users
// incoming calls has to be sent using normal push notifications

NSArray *bannedCountries = @[ @"CN", @"CHN" ];
NSString *userCountryCode = [[NSLocale currentLocale] countryCode];
BOOL isAppInChina = [bannedCountries containsObject:userCountryCode]

if (appIsInChina)
{
    [CGModule sharedManager].enableCallKit = NO;
}

//incoming calls will be received via non-VoIP push notification (see example CGAppTest for more details)
Android 33+
From Android SDK 33 and above you must request POST_NOTIFICATION permission to the user in order to make the Comelit SDK work
        if (Build.VERSION.SDK_INT >= Build.VERSION_CODES.TIRAMISU && ActivityCompat.checkSelfPermission(this,Manifest.permission.POST_NOTIFICATIONS) != PermissionChecker.PERMISSION_GRANTED) {
            int postNotificationsRequestCode = 123;
            ActivityCompat.requestPermissions(this,
                    new String[]{Manifest.permission.POST_NOTIFICATIONS}, postNotificationsRequestCode);
        }

